Categories
Feature Problem solving

Understanding Systems Thinking

Using Causal Loops, Reinforcing and Balancing Loops with Visual Tools to Address Systemic Failure

In an increasingly interconnected world, many of the challenges we face – whether in business, society, or personal life – are not isolated. They stem from complex systems made up of multiple interacting parts. When these systems fail or behave unexpectedly, it’s often because we have overlooked the relationships and feedback within them. This is where systems thinking becomes invaluable. By examining how components of a system influence one another, we can better understand, predict, and improve systemic outcomes.

This article will introduce you to key concepts in systems thinking, particularly causal loopsreinforcing loops, and balancing loops, and how visual tools can help us map and address systemic failure. We’ll also explore practical ways for you to apply these ideas to real-world problems using simple visualisation techniques.


What Is Systems Thinking?

At its core, systems thinking is a way of seeing and understanding the world. Instead of looking at individual parts in isolation, systems thinking encourages you to consider how parts interact as a whole. It highlights interdependencies, feedback, delays, and dynamic behaviour that traditional cause-and-effect thinking can miss.

A “system” can be any collection of interconnected elements that produce their own patterns of behaviour over time, such as:

  • An organisation
  • An ecosystem
  • A community
  • A market
  • A human body

When these systems fail, the reasons are usually not straightforward. For example, a company might see falling profits despite increasing sales due to rising costs and employee burnout—complex interactions within the “system” of the organisation.


Introducing Causal Loops

To understand and analyse complex systems, systems thinkers often use causal loop diagrams—a visual tool that maps out cause-and-effect relationships between different variables or elements in the system.

What Are Causal Loops?

A causal loop consists of variables connected by arrows showing the direction of influence from one factor to another. Each arrow is labelled with either a plus (+) or minus (–) sign indicating how one variable affects another:

  • plus (+) means that the two variables change in the same direction: if the first increases, the second increases; if the first decreases, the second decreases.
  • minus (–) means the variables change in opposite directions: if the first increases, the second decreases, and vice versa.

By connecting variables with these signed arrows, a chain of cause-and-effect relationships emerges, which eventually loops back to the starting point, forming what we call a causal loop.

Example of a Simple Causal Loop

Imagine a heating system in a room with a thermostat.

  • If the temperature inside the room drops, the thermostat senses this change.
  • The thermostat signals the heater to turn on.
  • The heater output increases.
  • This increases the room temperature.

Mapping this with causal arrows:

  • Temperature ↓ → Thermostat triggers Heater ↑ (plus, because lower temp leads to heater turning on)
  • Heater output ↑ → Room temperature ↑ (plus)
  • Room temperature ↑ → Thermostat triggers Heater ↓ (minus, because when temperature is high enough, heater turns off)

This causal loop helps explain how the system self-regulates temperature.


Reinforcing Loops vs. Balancing Loops

Causal loops come in two main types: reinforcing loops and balancing loops. Each plays a different role in system behaviour.

Reinforcing Loops (Positive Feedback Loops)

Reinforcing loops amplify change and cause exponential growth or collapse. In these loops, each action produces more of the same effect, creating a cycle of escalation or decline.

How Reinforcing Loops Work

If a variable increases and causes another variable to increase, which then further increases the first variable, this creates a reinforcing loop.

Example: Viral Growth of a Social Media Platform
  • More users on the platform → More content created → More attractive platform → More users join

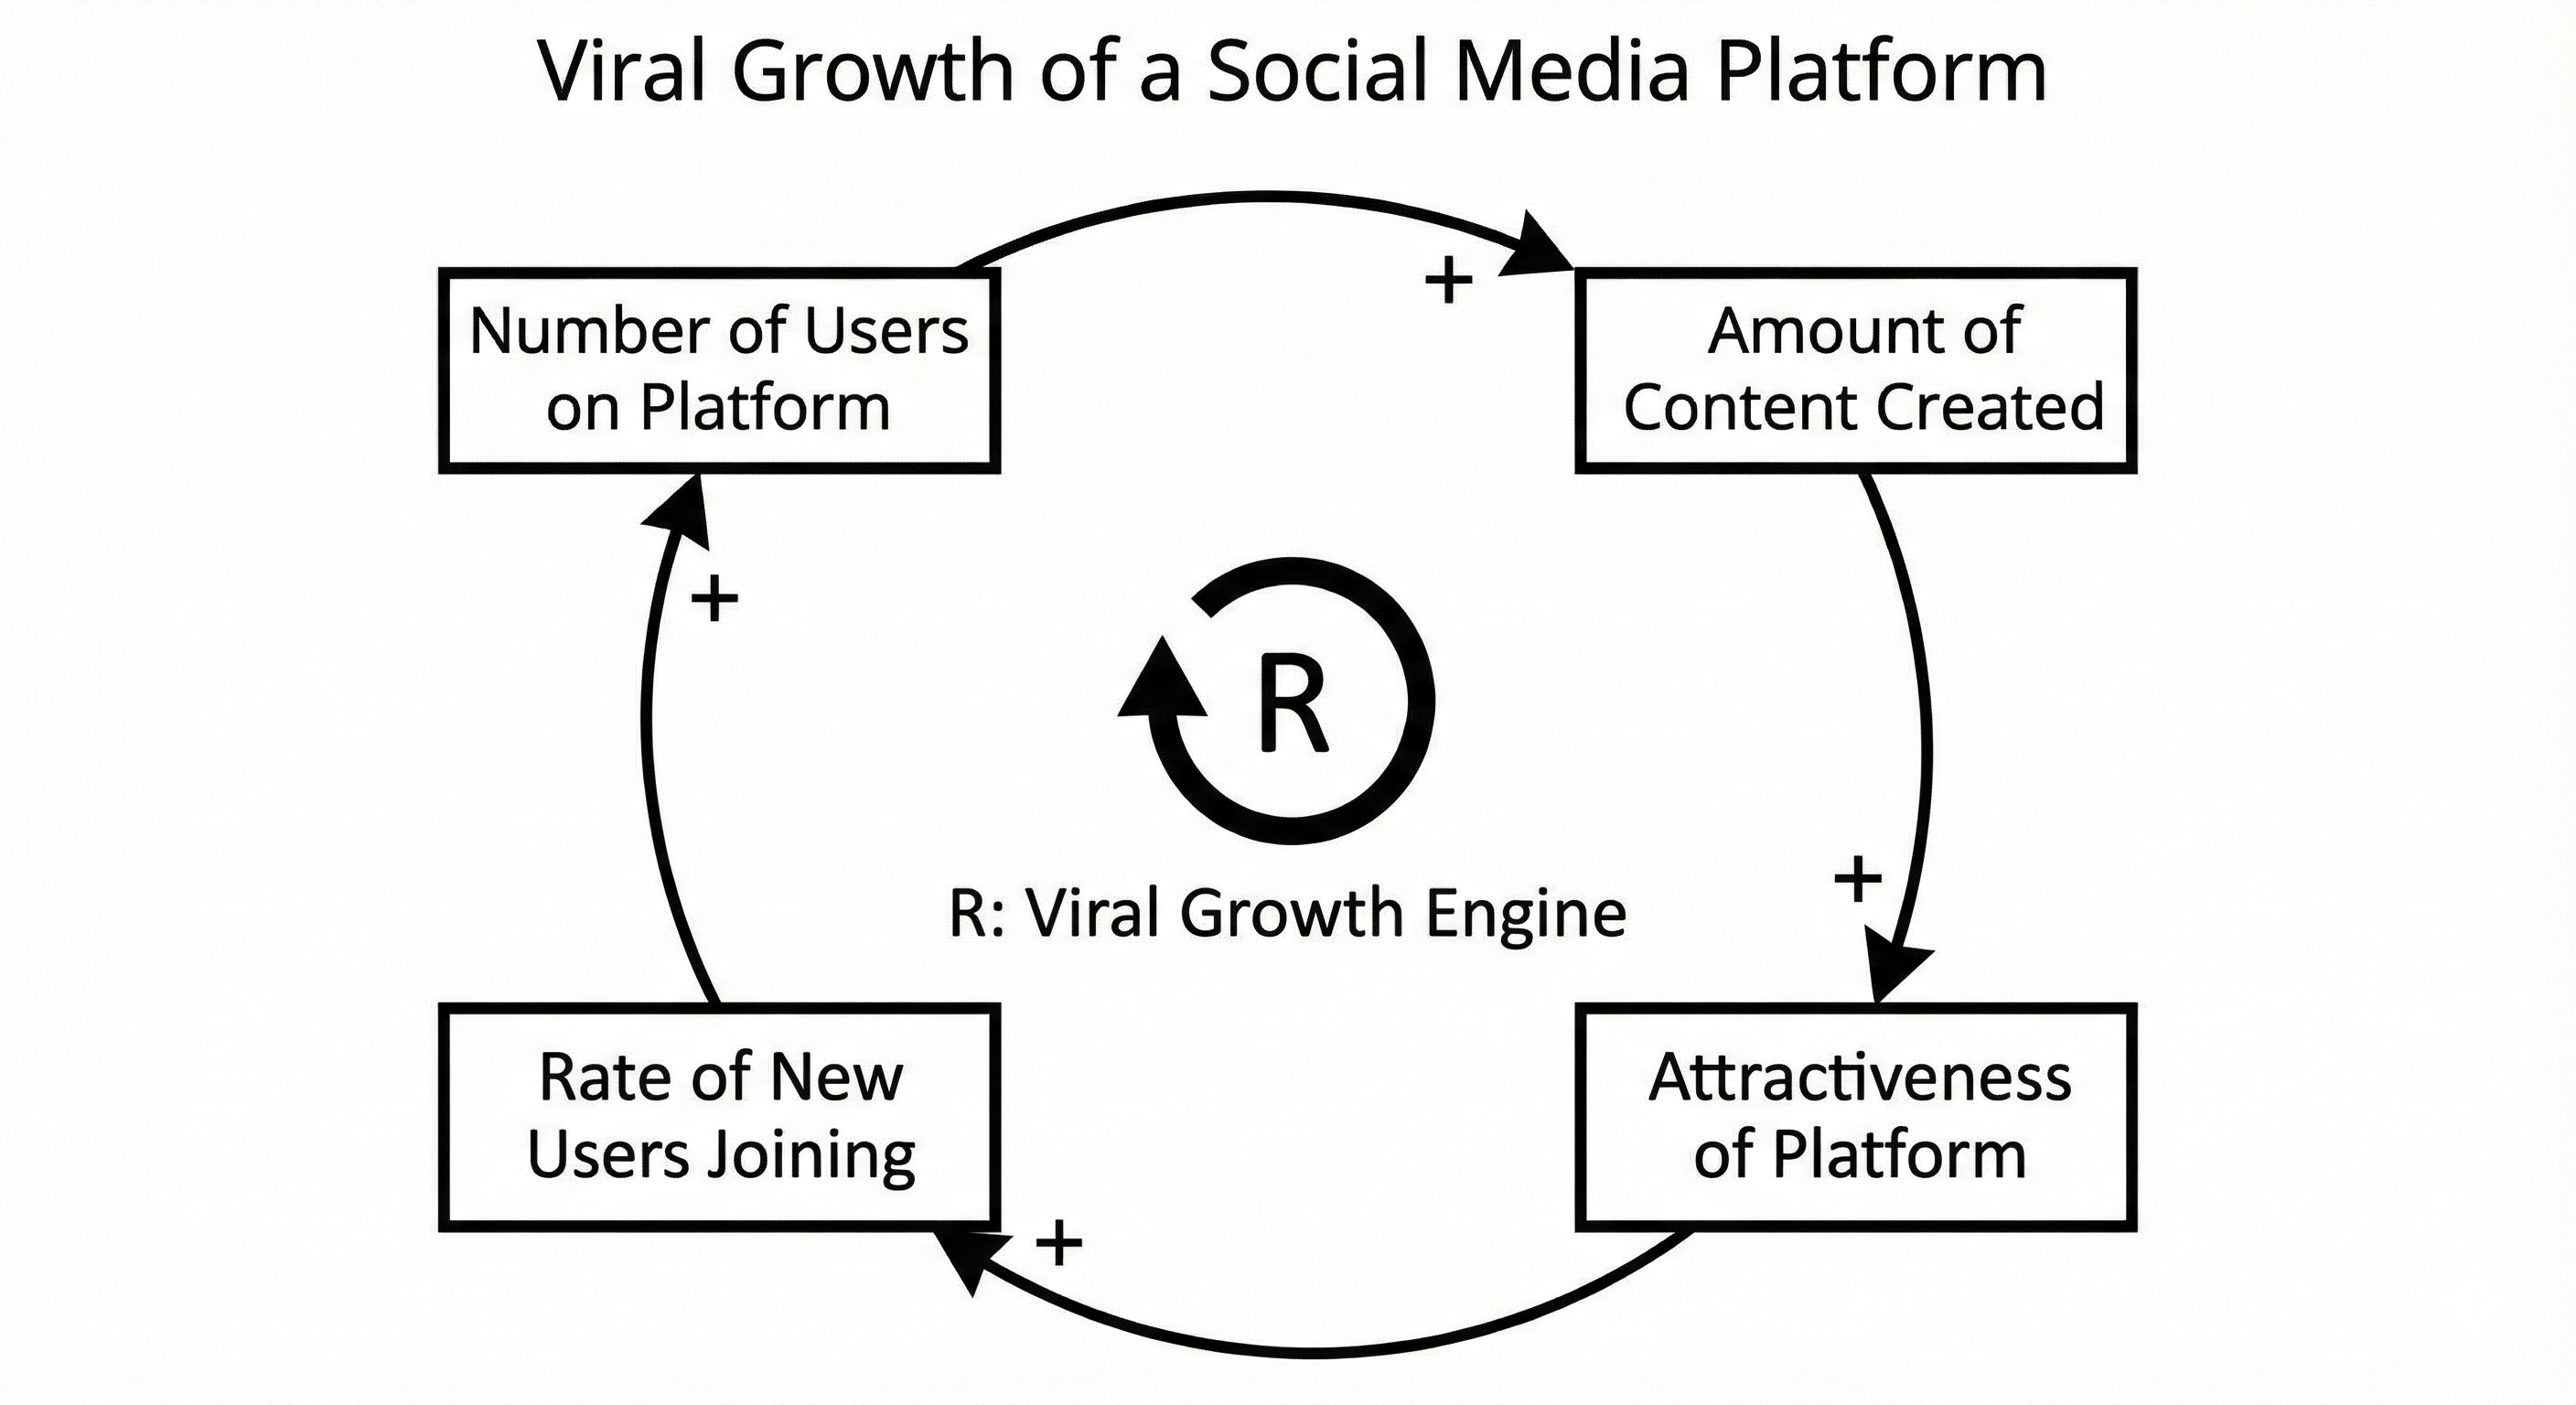
This creates exponential user growth as the loop keeps reinforcing itself.

Practical Implication

While reinforcing loops can lead to rapid growth, they can also accelerate declines or failures if the feedback is negative. For example, in a failing business, reduced product quality can drive customers away, reducing revenue and worsening quality further.

Balancing Loops (Negative Feedback Loops)

Balancing loops counteract change and promote stability or goal-seeking behaviour. They aim to keep a system at or near an equilibrium.

How Balancing Loops Work

An increase in a variable leads to effects that ultimately reduce the initial increase, balancing the system.

Example: Body Temperature Regulation
  • Body temperature rises → Sweating increases → Body temperature falls → Sweating decreases

This loop acts to maintain a steady body temperature.

Practical Implication

Balancing loops can stabilise systems but also create resistance to change, causing a system to be “stuck” unless external interventions occur.


Visual Tools for Understanding Complex Systems

Creating visual representations of systemic relationships using causal loops lets you:

  • Identify feedback structures driving system behaviour
  • Detect potential points of failure or leverage
  • Communicate complexity in a clear, intuitive format
  • Explore “what-if” scenarios to test interventions

How to Draw a Causal Loop Diagram

  1. Identify Variables
    Start by listing key quantities or factors relevant to the system or problem you want to understand. These could be things like sales, customer satisfaction, employee stress, infection rate, etc.
  2. Determine Relationships
    For each pair of variables, determine how one affects the other. Does an increase in one cause an increase (+) or decrease (–) in the other?
  3. Connect Variables with Arrows
    Draw arrows from the cause to the effect, labelling each arrow with + or – signs.
  4. Find Loops
    Trace paths that start and end at the same variable to identify loops.
  5. Label Loop Types
    Label each loop as either reinforcement (R) or balancing (B) based on the number of negative signs in the loop:
    • Even number of negatives → Reinforcing loop
    • Odd number of negatives → Balancing loop

Example: Managing Workplace Stress

Variables:

  • Employee workload
  • Employee stress level
  • Productivity
  • Errors made
  • Manager support

Possible relationships:

  • Workload (+) → Stress level (+)
  • Stress level (–) → Productivity (–)
  • Productivity (–) → Errors made (+)
  • Errors made (+) → Manager support (+)
  • Manager support (–) → Workload (–)

This example contains both reinforcing and balancing loops that influence workplace dynamics.


Addressing Systemic Failure Using Causal Loops and Feedback Loops

Systemic failure happens when the system’s structure leads to unintended or undesirable results. It might be a company declining despite good products or a city grappling with chronic traffic congestion despite infrastructure investment.

By modelling the system using causal loops, reinforcing, and balancing loops, you can:

  • Understand root causes beyond surface symptoms
  • Spot unintended feedbacks that worsen problems
  • Identify leverage points—places to intervene for maximum positive impact
  • Predict how changes will ripple through the system

Step-by-Step Process to Use Systems Thinking in Tackling Systemic Failure

1. Define the Problem Clearly

Start with a clear problem statement. For example:

  • “Why is customer satisfaction declining despite recent service improvements?”

2. List Key Variables

Write down variables related to the problem. These might include:

  • Customer satisfaction
  • Quality of service
  • Employee morale
  • Response time to complaints

3. Map Relationships and Draw Causal Loops

Link variables with arrows showing causality. Look for cycles that form reinforcing or balancing loops.

4. Identify Feedback Loops Causing Failure

Look for loops that may be driving the problem. For example, a reinforcing loop where poor service reduces satisfaction, leading to fewer customers and less revenue, which reduces investment in service.

5. Find Leverage Points

Leverage points are parts of the system where small changes produce big effects. For instance:

  • Improving employee morale to enhance service quality
  • Streamlining complaint handling to reduce response times

6. Design Interventions

Use your understanding of loops to design targeted changes that:

  • Break negative reinforcing loops
  • Strengthen balancing loops that promote stability
  • Create new loops that foster positive outcomes

7. Test Visually and Iterate

Redraw your causal loop diagrams with proposed interventions. Assess potential unintended consequences and tweak as needed.


Practical Action: Create Your Own Causal Loop Diagram

To make these concepts actionable, here’s a practical exercise you can do immediately, whether you’re a manager, student, or simply interested in improving understanding of complex issues.

Exercise: Mapping Your Personal Productivity System

  1. Identify Variables
    Think about factors affecting your productivity. Examples:
    • Hours worked 
    • Energy levels 
    • Task completion 
    • Stress 
    • Distractions 
  2. Determine Relationships
    Ask yourself for each pair of variables:
    • If hours worked increase, how does energy level change? (Often energy decreases, so negative sign) 
    • If distractions increase, does task completion increase or decrease? (Decrease, so negative) 
    • If task completion increases, does stress go up or down? (Usually down, so negative)
  3. Draw the Diagram
    Sketch these variables on paper or digitally. Connect with arrows and label + or –. 
  4. Identify Loops
    Find any causal loops and label them reinforcing or balancing. Example: Increased stress → reduced productivity → more stress (reinforcing loop).
  5. Reflect and Plan
    Which loops seem to trap you in unproductive cycles? How might you intervene? Perhaps introducing short breaks reduces
Categories
Feature Problem solving

Decision Journals

How Keeping a Decision Log and Analysing Outcomes Can Help You Refine Your Thinking Heuristics

In our days saturated with choices, ranging from the mundane to the life-changing, our ability to make sound decisions is paramount to personal success and satisfaction. However, making choices can often become overwhelming, leading to anxiety or indecision. So how do we enhance our decision-making capabilities? Enter the concept of Decision Journals—a powerful tool that not only aids in documenting choices but also encourages us to analyse their outcomes, allowing us to refine our thinking heuristics.

What are Heuristics?

Before we delve into the mechanics of keeping a decision log, it’s crucial to understand what heuristics are. Heuristics are mental shortcuts that help us process information and make decisions more efficiently. They allow us to function in a fast-paced world but can sometimes lead us astray if we rely on them too heavily without critical thinking. By refining our heuristics through analysis, we can improve our decision-making skills over time.

The Concept of a Decision Journal

A Decision Journal is essentially a logbook where you track your decisions, the reasoning behind them, and the outcomes that follow. It acts as a repository for your thought processes and allows for retrospective analysis. The practice can be both enlightening and practical, leading to enhanced clarity in future decision-making scenarios.

Benefits of Keeping a Decision Journal:

  1. Awareness: Documenting decisions makes you more conscious of the choices you are making and the reasons behind them.
  2. Learning from Experience: By analysing past decisions, both good and bad, you can identify patterns, improve strategies, and avoid repeating mistakes.
  3. Refinement of Heuristics: Regularly reviewing your decisions allows you to refine the rules of thumb you apply when faced with similar choices in the future.
  4. Reduced Anxiety: Having a structured approach to decision-making can alleviate feelings of overwhelm and doubt, knowing you’re actively improving your process.

Getting Started: Setting Up Your Decision Journal

Creating a Decision Journal doesn’t require anything fancy. Here’s an actionable guide to setting yours up effectively:

1. Choose Your Medium

Decide whether you prefer a physical notebook or a digital document. Apps such as Notion, Evernote, or even a basic spreadsheet can work well for this purpose. Choose a format that feels comfortable for you—one that you’ll want to return to consistently.

2. Define the Structure

A simple yet effective format for each entry might include:

  • Date
  • Decision made
  • Options considered
  • Reasoning behind the decision
  • Anticipated outcomes
  • Actual outcomes
  • Reflection on the results

This structure allows you to capture the essence of the decision-making process while providing enough detail for later analysis.

3. Commit to Regular Entries

Consistency is key. Set aside a specific time each week or month to reflect on recent decisions. This could coincide with a review of your goals or personal development progress.

Example of a Decision Journal Entry

Let’s illustrate this with a hypothetical example:

Date: 10th October 2025

  • Decision Made: Whether to accept a promotion that involves relocating to another city.
  • Options Considered:
    1. Accept the promotion and move.
    2. Stay in current position with no change.
    3. Look for other job opportunities in current city.
  • Reasoning Behind the Decision:
    • Pros: Increased salary, new challenges, potential career advancement.
    • Cons: Leaving friends and familiar environment, uncertainty about new city and job culture.
  • Anticipated Outcomes:
    • Greater financial stability, opportunities for networking, but potential loneliness during the transition.
  • Actual Outcomes:
    • Accepted the promotion. Transition was challenging at first; however, I built a supportive network and found the new role rewarding.
  • Reflection on the Results:
    • Although the initial move was tough, the long-term benefits surpassed my fears. Going forward, I will consider the importance of support networks in decision-making.

Analysing Outcomes

Once you have collected several entries, it’s time to embark on the reflective analysis phase. Here are some strategies to effectively analyse your decisions and refine your heuristics:

1. Identify Patterns

Look for recurring themes in your decisions. Are there certain situations where you consistently struggle? Are there decisions that regularly yield positive outcomes? Identifying these patterns can highlight areas of strength and weakness in your decision-making process.

2. Assess Your Reasoning

Evaluate whether your reasoning has been based on sound logic or emotional responses. Ask yourself:

  • Did my emotions influence this decision?
  • Were there facts or data available that I neglected?
  • Did I account for long-term outcomes rather than short-term benefits?

Your answers will reveal whether your heuristics need adjustment.

3. Consider Alternative Perspectives

For each decision, try to view it from an outsider’s perspective. If a friend came to you with the same dilemma, what advice would you give? This exercise can provide clarity and objectivity to your reflections.

4. Document Adjustments to Heuristics

As you analyse your decisions, note any adjustments you’d like to make to your thinking heuristics moving forward. For example, if you tend to rush to conclusions, you might decide to incorporate a waiting period where you reflect before finalising important decisions.

Continuing the Practice

Over time, your Decision Journal will evolve, becoming an invaluable resource for personal growth. Regularly revisit your entries to remind yourself of your journey, celebrate successes, and learn from failures. As you develop a deeper understanding of your decision-making patterns, you will naturally refine your heuristics and become a more effective decision-maker.

Final Thoughts

The art of decision-making is a skill that can be cultivated over time with reflection and practice. By keeping a Decision Journal, you not only document your choices but also actively engage in the process of learning from them. This practice will empower you to refine your heuristics and gain confidence in your ability to navigate life’s myriad choices.

So grab a notebook or open your preferred app, and start your Decision Journal today. Your future self will thank you for the insights and wisdom you gain along the way. Happy journaling!

Categories
Feature Stories

The Culture of Silence


1. The Quiet Meeting

The meeting should have been the exciting part.

SNAFU-Labs, a UK-based start-up building AI tools for customer service teams, had just raised Series A funding. The founders were expanding fast — new hires, new projects, new promises.

But this Monday’s product planning session felt heavy.

Eleanor, the new Head of Delivery, stood by the glass wall scribbling ideas on the whiteboard. “Let’s talk about the next sprint — what blockers do we have?” she asked.

Silence.

Four engineers stared at their laptops. A designer adjusted his chair. Someone coughed.

After a few seconds, one developer mumbled, “Everything’s fine.”

Eleanor knew it wasn’t fine. The last release had been delayed twice. Bugs were stacking up, and one key feature was quietly failing in production. But no one wanted to say it.

As she left the room, she noticed the CTO laughing with the CEO in the hallway. “We’re almost ready for the investor demo,” he said confidently.

Eleanor thought: Almost ready — but no one’s talking about what’s actually broken.


2. Early Symptoms

Over the next two weeks, Eleanor watched the same pattern repeat.

Meetings were polite, brief, and utterly unhelpful. Issues appeared only after deadlines. Slack messages were cautious — full of emojis and softeners like “might be worth checking” or “just a small thing.”

When she asked for honest feedback in retrospectives, people smiled and said, “We’re learning loads.”

But delivery metrics told a different story: velocity down 25%, rework up 40%.

She started to realise the issue wasn’t technical. It was cultural.

The team had learned that speaking up carried risk — not reward.


3. Finding the Friction

Eleanor invited a few colleagues for coffee and gentle probing. “What’s really going on?” she asked.

One engineer hesitated before saying, “Honestly… people stopped raising issues after one of the demos.”

He explained: a few months earlier, a junior developer had flagged a concern about data privacy in a sprint review. The CEO — known for his intensity — dismissed it as “too negative.” Afterwards, the team joked privately about not “poking the bear.”

The message stuck. From then on, everyone focused on making progress look smooth, not real.

It wasn’t malice — it was self-preservation.


4. Making the Invisible Visible

Eleanor had been trained in Systems Thinking, and recognised the signs of a feedback system gone wrong.

In SNAFU-Labs’ case, the structure of communication — how information moved between teams and leaders — created the behaviour of silence.

She drew a quick causal loop on her whiteboard:

  • Fear of criticism increased withholding of information.
  • Withholding information reduced problem visibility.
  • Reduced visibility led to bigger surprises, triggering harsher reactions — which reinforced fear.

A reinforcing loop — self-sustaining and toxic.

(Explore more about how reinforcing loops operate in Systems Thinking and Systemic Failure.)

She realised she couldn’t fix the system by telling people to “speak up.” She had to change the environment that made silence rational.


5. The Force Field Session

Eleanor asked for permission to run a workshop — “just a reflection session,” she told the CEO. He agreed, distracted by investor calls.

She gathered a cross-functional group of ten: engineers, designers, PMs, and one founder.

On a whiteboard, she drew two columns and titled it Force Field Analysis: What’s Driving Silence vs What Could Drive Openness.

Then she asked: “Why is it hard to speak up here?”

At first, people hesitated. Then someone said, “Because bad news is punished.” Heads nodded.

They filled the left column with “driving forces”:

  • Fear of CEO reaction
  • Time pressure to deliver “wins”
  • Lack of clarity on priorities
  • Feeling unheard

Then, in the right column — “restraining forces”:

  • Supportive peers
  • Shared desire to build something meaningful
  • Pride in quality work
  • A growing recognition that hiding problems wasn’t sustainable

The balance was obvious. The drivers of silence were stronger than the enablers of openness.

Eleanor closed the session by saying, “We don’t need to remove all fear — just make honesty slightly easier than avoidance.”


6. A Small Experiment

Instead of rolling out a grand “cultural initiative,” Eleanor started with one controlled change:

At the end of every sprint, she replaced the formal “retrospective” with a short, candid After Action Review (AAR).

The format was simple:

  1. What did we expect to happen?
  2. What actually happened?
  3. Why was there a difference?
  4. What can we learn?

No minutes, no recording, no formal blame. Just a 15-minute talk.

The first time, only three people spoke. By the third session, the whole team was sharing.

Someone said, “I thought the API limit issue was mine, but turns out everyone was hitting it.”
Another added, “I didn’t raise it earlier because I didn’t want to look like I was behind.”

Eleanor noticed a shift — a sense of relief.


7. Cracks and Light

Three weeks later, a major incident hit: the chatbot API failed under customer load.

Instead of scrambling silently, the team immediately opened a shared Slack channel named #open-incident. They documented steps, shared updates, and asked for help.

The issue was fixed within six hours — half the time of the previous outage.

When the CEO joined the channel later, expecting chaos, he saw calm collaboration. “Whatever you’re doing,” he wrote, “keep doing it.”

For the first time, feedback flowed upward as easily as it flowed down.

Eleanor smiled. The silence was breaking.


8. Learning from the System

At the next AAR, the team discussed the incident openly. One engineer said, “We realised we were scared of being blamed for outages, but now that we shared everything, the fix was faster.”

Eleanor drew a new version of her causal loop:

  • Psychological safety led to faster problem visibility.
  • Faster visibility led to shared solutions.
  • Shared solutions improved trust and confidence.
  • Trust reinforced safety — a new reinforcing loop, but positive this time.

The system hadn’t been “fixed” — it had been rebalanced.


9. The Founder’s Shift

Eleanor scheduled a private session with the CEO to show the difference.

“Before,” she said, pointing to a graph, “we were optimising for performance metrics — but suppressing feedback. Now we’re optimising for learning — and delivery is stabilising naturally.”

The CEO listened. “So the silence wasn’t laziness?”
“No,” she said. “It was protection. People adapt to what the system rewards.”

He nodded slowly. “Then we should reward openness.”

A week later, the CEO shared a public message in the company Slack:

“We’ve been too focused on being right. From now on, I’d rather we be curious.”

It wasn’t a manifesto. But it mattered.


10. Signs of Change

Six months later, SNAFU-Labs’ pulse survey showed a 30% increase in employees who agreed with the statement:

“I feel safe to raise issues that could delay delivery.”

Delivery lead time improved. Turnover dropped.

But the deeper change was invisible: conversations that once stayed in private DMs now happened in public threads. Leaders began asking, “What are we not hearing?”

Eleanor called it constructive noise.
To her, it was the sound of a healthy system breathing again.


Reflection: How Silence Speaks

Silence isn’t the absence of communication — it’s the output of a system designed to avoid conflict.

In SANFU-Labs’ case, reinforcing loops of fear and pressure made silence rational. The breakthrough came from applying tools that helped people see and rebalance those forces:

The lesson: Culture doesn’t change through slogans. It changes when the system starts rewarding the right behaviours.

(See Symptom Sensing to explore how subtle human signals point to deeper structural issues.)


Author’s Note

This story explores how feedback systems shape behaviour — and how leaders can transform silence into learning by changing conditions, not people.

Tools like Systems ThinkingForce Field Analysis, and After Action Review help uncover and rebalance invisible forces that drive dysfunction.

Within the Failure Hackers problem-solving lifecycle, this story sits at the “understanding the system” stage — where insight emerges from patterns, not blame.

When teams stop fearing failure, they start innovating again.
And that’s when the real work begins.

Categories
Feature Problem solving Resources

After Action Review (AAR) Made Practical


A Structured, Blameless Approach to Asking the Four Key Questions, Running Mini vs Full Sessions, and Turning Insights into Owned Actions

In fast-moving organisations, learning is a competitive advantage. Teams that learn quickly from what has just happened — whether success, failure, or something in between — outperform teams that wait for end-of-year reviews, post-mortems, or long-form evaluation reports that nobody reads. The After Action Review (AAR) is one of the most powerful tools available to build a culture of continuous learning and continuous improvement. Originally developed by the U.S. Army to improve operational performance, the After Action Review (AAR) is now widely used in technology, healthcare, emergency services, construction, consulting, and major transformation programmes.

At its heart, an AAR is a structured, blameless, rapid learning conversation, held as soon as possible after an event, incident, milestone, release, meeting, or experiment — when memories are still fresh and emotions are still honest. Unlike traditional reviews that look backwards to allocate blame or justify decisions, a well-run AAR is about collective responsibility, shared learning, and improvement for next time.

This article walks step-by-step through:

  • The four core AAR questions
  • A simple facilitation script anyone can use
  • When to run a Mini-AAR vs a Full AAR
  • Templates for capturing insights and turning them into actions
  • How to close the learning loop
  • How to avoid common traps such as defensiveness, vague insights, or unowned actions

The goal is to remove mystique and make AARs a normal part of daily work — fast, repeatable, productive, and psychologically safe.

————————

What Is an After Action Review (AAR)?

An After Action Review (AAR) is a structured discussion that helps a team understand:

  • What was supposed to happen
  • What actually happened
  • Why there was a difference
  • What we will change next time

It is not about blame, fault-finding, or proving who was right. AARs should be:

  • Blameless
  • Fast
  • Open
  • Focused on insight before conclusion
  • Action-oriented

AARs work equally well after success and failure. Celebrating what went well is just as important as identifying what went wrong — and often reveals repeatable patterns worth scaling.

————————

Why AARs Matter

Teams that use AARs consistently benefit from:

AdvantageDescription
Faster learning cyclesInsights are captured immediately rather than months later
Better performanceContinuous insight leads to continuous improvement
Stronger trustBlameless discussion reinforces shared responsibility
Better decision-makingClearer understanding of cause and effect
More resilient deliveryThe team builds capability to anticipate and prevent issues

The most common regret from leaders who adopt AARs is simply: “I wish we had started doing this years ago.”

————————

The Four Core AAR Questions

Every AAR — whether five minutes or two hours — uses the same four questions:

1. What was supposed to happen?

Clarifies expectations, intent, and assumptions.

2. What actually happened?

Describes facts and observations, not opinions or blame.

3. Why was there a difference?

Reveals root causes, contributing factors, and insights.

4. What will we change next time?

Translates learning into action and accountability.

Avoid the temptation to jump straight to Question 4 — reflection is where the real learning happens.

————————

A Simple Facilitation Script (Step-by-Step)

The following script works for any team, regardless of size or seniority.

Preparation

  • Invite only the people directly involved
  • Make it psychologically safe: no blame, no judgement
  • Explain the purpose: to learn and improve
  • Allocate a facilitator, scribe, and time-box

Opening (2 minutes)

Facilitator script:

“Thanks everyone for joining this After Action Review. The purpose of this session is to learn quickly from what happened so we can improve next time. This is a blameless discussion — we are looking at the system, the process, and the situation, not people. We’ll work through four questions together. Speak from your own perspective and be concrete. Let’s focus on what we can control or influence.”

Ground rules (read aloud):

  • No blame, no judgement
  • Describe facts, not opinions
  • Listen without interruption
  • Stay curious
  • Keep it practical and specific

Question 1 — What was supposed to happen? (5–10 minutes)

Prompt with:

  • What was the plan?
  • What did we expect and why?
  • What assumptions did we make?

Question 2 — What actually happened? (5–10 minutes)

Prompt with:

  • What happened step-by-step?
  • Where did we diverge from the plan?
  • What surprised us?

Question 3 — Why was there a difference? (10–15 minutes)

Prompt with:

  • What were the causes or contributing factors?
  • What signals did we miss, ignore, or misinterpret?
  • What would we do differently if we could replay the situation?

Use “5 Whys”, fishbone diagrams, or timeline mapping if appropriate.

Question 4 — What will we change next time? (10–15 minutes)

Prompt with:

  • What are our top actionable insights?
  • What is the smallest meaningful improvement we can implement now?
  • Who owns each action and by when?

Close with:

“Thank you. These actions now belong to us collectively. We’ll review progress at our next stand-up / weekly meeting / project board.”

————————

AAR Insight & Action Template

Use this table during the session:

Insight / ObservationRecommended ActionOwnerDue DateStatus
Example: Testing environment unstable caused build delaysStabilise test environment and automate nightly checksAlex12 AprilIn progress

Checklist for strong actions

  • Clear – everyone understands what needs to be done
  • Specific – concrete, not vague
  • Owned – one clear accountable person (not a group)
  • Time-bound – has a deadline
  • Visible – tracked in the team’s normal workflow

If an item is assigned to “all” or has no date, it is not an action — it is wishful thinking.

————————

Mini-AAR vs Full AAR: When to Use Each

Mini-AARFull AAR
5–10 minutes45–120 minutes
Immediately after daily eventsAfter major milestones or incidents
Fast reflection, one or two insights onlyDeep dive and root-cause analysis
Run in stand-ups, after meetings, after experimentsIncludes data, visuals, timelines, role perspectives
Used for building habitUsed for significant improvement

Simple test:

If it takes longer to book the meeting than to run it, do a Mini-AAR.

Examples:

  • After a high-stakes presentation
  • After a sprint review or demo
  • After a deployment or release
  • After a community event or workshop
  • After a customer or stakeholder meeting

————————

Common Traps and How to Avoid Them

TrapHow It AppearsHow To Avoid
DefensivenessPeople justify or protect reputationUse neutral language. Stop blame immediately. Ask: What can we learn from this?
Vague insights“Communication needs to improve”Ask: How specifically? Convert into action: Agree response-time SLA for internal messages.
Unowned actionsNo follow-throughUse action owner + deadline. Track in backlog.
Dominant voiceOne or two people speak for allFacilitate round-robin input.
Too lateReview months after eventRun within 24–72 hours.
Over-focusing on failureNo learning from successAlways ask: What worked well? Why? How do we repeat it?

————————

Psychological Safety: The Foundation for Blameless Learning

AARs only succeed when it is safe to tell the truth. Leaders set tone, intentionally.

Leadership behaviours that build safety:

  • Admit their own mistakes first
  • Ask honest questions
  • Thank people for candour
  • Reward contributors, not performers
  • Focus on systems, not individuals

Phrases facilitators should use:

  • “Help me understand what happened.”
  • “What else might have contributed?”
  • “What do we know now that we wish we knew then?”

Phrases to avoid:

  • “Who is responsible for this failure?”
  • “Why didn’t you do what you were told?”
  • “That’s not what happened.”

————————

Closing the Loop: Making Learning Stick

Learning is useless unless it changes future behaviour. To embed improvement:

After the AAR

  • Publish the agreed insights and actions to the team
  • Add actions to the team backlog or workflow board
  • Review progress weekly
  • Repeat learning into future reviews

At the start of the next AAR

Ask:

“What actions did we commit to last time, and what changed as a result?”

This reinforces delivery, accountability, and continuous improvement.

————————

Example AAR Summary Template (Ready to Copy)

After Action Review Summary

Event: ______________________

Date: _______________________

Participants: _______________

What was supposed to happen?

What actually happened?

Why was there a difference?

What will we change next time?

Actions:

Action Owner Date Status

Next review date: ______________

————————

Real-World Example Scenario

Context: Project sprint ended late, delaying release.

Mini-AAR outcome:

  • What was supposed to happen? Complete planned stories by Friday.
  • What actually happened? Two critical tasks carried over.
  • Why was there a difference? Requirements unclear; too many dependencies.
  • What will we change next time? Add refinement checklist; set dependency review meeting at sprint start.

Actions:

ActionOwnerDue Date
Create refinement checklistJamieMonday
Add dependency review into sprint planPriyaNext sprint

Loop closed: Deadline met next release.

Small improvement, big impact.

————————


Tips for Facilitators New to AARs

TipWhy it matters
Time-box harder than you thinkKeeps pace, avoids over-analysis
Write visibly (whiteboard, shared doc, Miro)Creates shared understanding
Ask clarifying questionsPrevents assumptions
Separate data from interpretationEncourages objectivity
Periodically summariseMaintains alignment
End on action and appreciationReinforces positive culture

Build AARs Into the Team Rhythm

To make AARs normal:

  • Add Mini-AAR to the end of stand-ups on Fridays
  • Add Full AAR after every major delivery milestone
  • Add AAR actions as a column on the Kanban board
  • Model leadership participation

The goal is habit over ceremony.


Conclusion: Make Learning a Practice, Not an Event

AARs transform how teams learn because they:

  • Capture insight when it is fresh
  • Build trust and psychological safety
  • Turn reflection into concrete improvement
  • Create continuous learning loops

Running effective AARs does not require specialist training, external consultants, or expensive tools. All it takes is a blameless mindset, four simple questions, and the discipline to capture and act on insights.

If you do nothing else except ask these four questions at the end of every meaningful activity, your team will grow stronger, faster, and more aligned:

  • What was supposed to happen?
  • What actually happened?
  • Why was there a difference?
  • What will we change next time?

Start today. Run a Mini-AAR after the next meeting, release, or customer call. Keep it short. Keep it safe. Keep it honest. Record one improvement. Deliver it. Review it. Repeat.

That is what continuous improvement looks like in real life.


Practical Next Step

Before you close this tab, schedule your first AAR:

  • When will you run it?
  • After what event?
  • Who will facilitate?

Learning starts with action.

Run one. Learn fast. Get better. Repeat.

Categories
Feature Problem solving Resources

Building Your Personal Problem-Solving Playbook

A Step-by-Step Guide to Creating a Reusable Toolkit of Methods and Checklists

In life, whether at work or in our personal lives, we inevitably encounter problems. Some are minor inconveniences, while others can feel quite overwhelming. The key to navigating these challenges is having a solid approach to problem-solving. By creating your own personal problem-solving playbook— a reusable toolkit of methods and checklists—you can face obstacles with confidence and clarity.

This article will guide you step by step through the process of establishing your personalised problem-solving toolkit. You’ll learn how to identify problems effectively, develop strategies to tackle them, and compile a resource that will serve you well in various situations.

Step 1: Identify Common Problems You Encounter

The first step in developing your toolkit is recognising the issues you frequently face. This self-assessment will help you understand which areas you need to focus on improving. Reflect on different aspects of your life, such as:

  • Work-related challenges: Missed deadlines, unclear communication, conflicts with colleagues.
  • Personal life difficulties: Time management, maintaining relationships, financial planning.
  • Health and wellness obstacles: Motivation for exercise, dietary habits, mental health considerations.

Spend some time journaling about these challenges. Once you have a list, you can prioritise them based on frequency and impact. Which problems tend to arise repeatedly? Which ones cause the most stress? 

Step 2: Explore Problem-Solving Methods

With a clearer understanding of the problems you often face, it’s time to delve into various problem-solving methods. There are several techniques you can incorporate into your playbook:

1. The 5 Whys Technique

This method involves asking “why” five times to delve into the root cause of a problem. For example, if you’re consistently late for work, you might ask:

  • Why am I late? (I don’t leave home on time.)
  • Why don’t I leave on time? (I underestimate my morning routine.)
  • Why do I underestimate my routine? (I don’t account for traffic.)

Continue this process until you reach the underlying issue. This method helps clarify the real barriers you need to address.

See Mastering the Five Whys technique article for more.

2. SWOT Analysis

A SWOT analysis examines the Strengths, Weaknesses, Opportunities, and Threats related to a particular situation or decision. To apply it:

  • Create a grid with four sections labelled as Strengths, Weaknesses, Opportunities, and Threats.
  • Fill in each section based on the specific problem you’re addressing. 
    This structured approach allows you to weigh your options thoroughly.

3. Brainstorming

Gathering ideas can be incredibly effective. Set a timer for 10-15 minutes and write down every possible solution to your problem without judgement. Later, evaluate the ideas for feasibility and potential impact. This method thrives on creativity and may yield surprising solutions.

4. Mind Mapping

Mind mapping visualises problems and their connections. Start with the central problem written in the middle of a page, then branch out with related causes, effects, and potential solutions. Mind maps can stimulate creative thinking and help you see the bigger picture.

5. The Eisenhower Matrix

This tool helps prioritise tasks by categorising them into four quadrants based on urgency and importance. The quadrants are:

  • Urgent and Important
  • Not Urgent but Important
  • Urgent but Not Important
  • Neither Urgent nor Important

Utilise this matrix when you are grappling with multiple issues to identify what needs immediate attention.

See Prioritising Team Backlogs using the Eisenhower Matrix article.

Step 3: Develop Checklists for Each Method

Creating checklists will provide you with clear steps to follow whenever you encounter a challenge. Checklists are easy to use and can save time by ensuring you don’t forget critical components of your strategy.

Example Checklists

5 Whys Checklist

  1. Clearly define the problem.
  2. Ask “why” and note the answer.
  3. Repeat asking “why” up to five times or until you reach a root cause.
  4. Identify actionable steps to address the root cause.

SWOT Analysis Checklist

  1. Define the problem or decision.
  2. List strengths relevant to the situation.
  3. List weaknesses that could hinder progress.
  4. Explore opportunities that could be leveraged.
  5. Identify threats that could pose risks.

Brainstorming Checklist

  1. Set a timer for idea generation.
  2. Write down all ideas without filtering.
  3. Review and categorise ideas after the timer ends.
  4. Select the most viable ideas for further exploration.

Mind Mapping Checklist

  1. Write the main problem in the centre.
  2. Create branches for causes, effects, and solutions.
  3. Continue branching out with sub-ideas.
  4. Review the mind map to identify potential solutions.

Eisenhower Matrix Checklist

  1. List all tasks/issues you are currently facing.
  2. Place each task in the appropriate quadrant of the matrix.
  3. Focus on completing tasks in the Urgent and Important quadrant first.
  4. Delegate or eliminate tasks in the Not Urgent and Not Important quadrant.

Step 4: Customise Your Playbook

Your problem-solving toolkit should reflect your unique style; thus, tailor it to suit your preferences. Consider the following elements to make it your own:

  • Format: Will you create a digital document, a physical notebook, or even a mobile app to store your playbook?
  • Visual Aids: Incorporate diagrams, colours, or symbols that resonate with you. Visual stimulation can enhance retention and engagement.
  • Personal Reflections: As you use each method, jot down reflections on what worked well and what didn’t. Over time, this will enrich your playbook with personal insights.

Step 5: Regularly Review and Update Your Toolkit

A problem-solving playbook is not static; it should evolve alongside you. Schedule regular reviews, perhaps once every quarter, to assess the effectiveness of your methods and checklists. Ask yourself questions like:

  • Have the problems changed, and if so, how?
  • Are there new techniques I’ve learned that could improve my toolkit?
  • Which methods have brought the best results?

Updating your playbook ensures that it remains relevant, fresh, and powerful in guiding you through challenges.

Conclusion

Building your personal problem-solving playbook is an empowering journey that equips you with the tools to tackle life’s challenges head-on. By identifying common problems, exploring diverse methods, creating actionable checklists, customising your playbook, and reviewing it regularly, you’ll cultivate a valuable resource that bolsters your problem-solving capabilities.

As you start compiling your toolkit, remember that the most meaningful insights come from your experiences. Stay curious, remain adaptable, and embrace the challenges that come your way. Your playbook will become a trusted companion, enabling you to navigate obstacles with resilience and confidence. Happy problem-solving!